ChengCZ's Notebook

  • Home

  • Tags

  • Categories

  • Archives

  • About

  • Search

从 vcf 文件准备 ANNOVAR 数据库

Posted on 2018-06-16 | Edited on 2020-01-07 | In bioinfor

annovar可以说是最常用的变异注释软件了,除了基于基因位置进行注释,还有丰富的第三方数据库支持,clinvar, cosmic等等,但是annovar提供下载数据库版本较老,需要自行下载第三方 vcf 进行转换。

以 clinvar 为例说说 vcf 格式转换成 annovar 可识别表格格式,annovar 仅需要 vcf 中部分信息,为了脚本通用这里输出vcf所有信息到 tab 格式,详细处理脚本如下,同时实现脚本存放 github。

1
2
3
4
5
6
7
8
9
10
11
12
13
14
15
16
17
18
19
20
21
22
23
24
25
26
27
28
29
30
31
32
33
34
35
36
37
38
39
40
41
42
43
44
45
46
47
48
49
50
51
52
53
54
55
56
57
58
59
60
61
62
63
64
65
66
67
68
69
70
71
72
73
import gzip


def Parse_Variant_Annovar_Style(line):
CHROM, POS, ID, REF, ALT, QUAL, FILTER, INFO = line.split('\t')[:8]
# 一般公共数据下载的 vcf 文件仅包含8列
POS = int(POS)
dat = {}
dat['CHROM'] = CHROM
dat['ID'] = ID
if len(REF) == len(ALT) == 1 and REF != ALT: # SNV
dat['START'], dat['END'] = POS, POS
dat['REF'], dat['ALT'] = REF, ALT
elif len(REF) == 1 and len(ALT) != 1 and ALT.startswith(REF): # Insert
dat['START'], dat['END'] = POS, POS
dat['REF'], dat['ALT'] = '-', ALT[1:]
elif len(REF) != 1 and len(ALT) == 1 and REF.startswith(ALT): # Delete
dat['START'], dat['END'] = POS+1, POS+len(REF)-1
dat['REF'], dat['ALT'] = REF[1:], '-'
else: # complex variant
dat['START'], dat['END'] = POS, POS+len(REF)-1
dat['REF'], dat['ALT'] = REF, ALT
dat.update(INFO2dict(INFO))
return dat


def Parse_Variant(line):
CHROM, POS, ID, REF, ALT, QUAL, FILTER, INFO = line.split('\t')[:8]
# 一般公共数据下载的 vcf 文件仅包含8列
POS = int(POS)
dat = {}
dat['CHROM'] = CHROM
dat['ID'] = ID
dat['START'], dat['END'] = POS, POS+len(REF)-1
dat['REF'], dat['ALT'] = REF, ALT
dat.update(INFO2dict(INFO))
return dat


def INFO2dict(info):
tmp = [i.strip() for i in info.split(';') if i.strip()]
infor = {}
for i in tmp:
if '=' in i:
# index = i.index('=')
# infor[i[:index]] = i[index+1:]
i = i.split('=')
infor[i[0]] = i[1]
else:
infor[i] = 'true'
return infor


fopen = gzip.open if clinvar.endswith('gz') else open
# 这种文件打开适用于 python2, python3 中存在 bits 和 string 类型的差别
with fopen(input_vcf) as f:
tags = []
for i in f:
if not i.strip():
continue

if i.startswith('##INFO='):
tags.append(i.split(',')[0].split('=')[-1])
elif i.startswith('#CHROM'):
print('#CHROM\tSTART\tEND\tID\tREF\tALT\t{}\n'.format('\t'.join(tags)))
elif not i.startswith('#'):
dat = Parse_Variant_Annovar_Style(i)
# dat = Parse_Varitn(i)
for x, label in enumerate(['CHROM', 'START', 'END', 'ID', 'REF', 'ALT']+tags):
if x != 0:
print('\t')
print(dat.get(label, '--')) # INFO 列中某些 tag 并不存在于所有行
print('\n')

编写 python 的几种 config 处理方式

Posted on 2018-05-28 | Edited on 2018-07-31 | In python

编写分析流程时候,为了兼容性总会设置一些常用选项配置文件输入,不同配置方式各有一些特点,就用过的几种配置方式简单整理

script —— config.py

1
2
3
4
5
6
import os
import sys
# sys.path.insert(0, 'config_py_dirname') # 使config.py文件位于PYTHONPATH路径下
import config

option = config.option # 获取配置信息

书写方式完全按照python脚本进行,可读性较高,问题在于PYTHONPATH的处理,脚本环境内键值对可能产生的覆盖问题,准确导入分析流程

configparser —— config.ini

1
2
3
4
5
6
7
8
9
10
11
12
import configparser    # python3
# import Configparser as configparser # python2

cf = configparser.ConfigParser()
cf.read('config.ini')

sections = cf.sections() # 列出所有section
options = cf.options(section) # 列出section对应的所有option
value = cf.get(section,option) # 范围section对应option的值,string
# getint(section,option) 返回为int,
# getboolean(section,option) 返回bool,
# getfloat(section,option) 返回float

但是,在configparser模块中不区分section, option大小写,一次读取一条配置信息

json —— config.json

1
2
3
4
5
6
7
8
9
import json

# 倒入配置json到python环境,config类型跟json内容相关
with open('config.json') as f:
config = json.load(f)

# 输出python对象到json文件
with open('whatever.josn', 'w') as f:
json.dump(config, f, indent=2)

json文件格式要求较严格,书写配置文件容易手误出错,相比之下更适用于流程中数据传递

yaml —— config.yaml

1
2
3
4
import yaml

with open('config.yaml') as f:
config = yaml.load(f) # dict OR list

YAML 语法规则

  • 大小写敏感
  • 使用缩进表示层级关系
  • 使用空格缩进,不允许使用Tab键
  • 相同层级的元素左侧对齐即可
  • 使用 # 作为注释符号
1
2
3
4
5
6
7
8
9
10
11
12
13
14
15
16
17
18
# 表示 key-value 对
key1: value2
key2: value2

# 表示 list
- value1
- value2
# [value1, value2]

# 时间表示
date: 2018-05-24 # iso8601

# None表示
key: ~

# bool表示
flag1: true
flag2: false

相比于上面几种方法,yaml可读性高,容易书写,不用考虑PYTHONPATH问题,批量导入配置信息

HGVS Recommendations for the Description of Sequence Variants: 2016 Update

Posted on 2018-05-20 | Edited on 2020-01-07 | In read

http://varnomen.hgvs.org/recommendations/, 描述规则基本格式为:[identifier]:[levels].[Description of variant]

[identifier]

  • only public files from NCBI or EBI are accepted as reference sequence files
  • a reference sequence file identifier should contain both the accession and version number
  • specifications to a specific annotated segment of a reference sequence can be given in parentheses directly after the reference sequence
  • the reference sequence used must contain the variant residue described

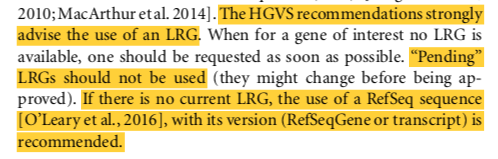
其他具体要求描述可以参考:http://varnomen.hgvs.org/bg-material/refseq/

[levels]

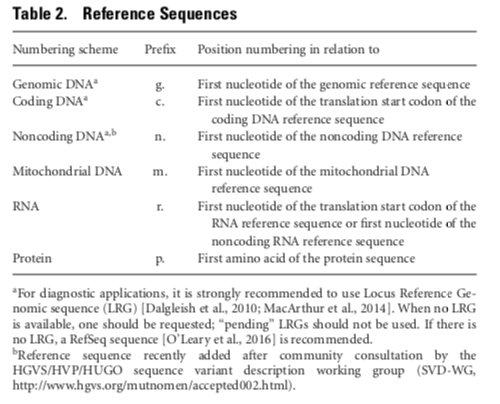
Reference Sequence Types主要有g, c, n, m, r, p六种,其中c, p, g使用最多

[Description of variant]

  • 替换
    • cDNA: c.255C>A
    • protein: p.Trp24Cys, p.Trp24*, p.Cys188=
  • 缺失
    • cDNA: c.19_21del
    • protein: p.Lys23_Val25del
  • 插入
    • cDNA: c.240_241insAGG
    • protein: p.Lys2_Gly3insGlnSerLys
  • 重复
    • cDNA: c.20_23dup
    • protein: p.Ser6dup
  • 插入缺失
    • cDNA: c.142_144delinsTGG
    • protein: p.Arg48Trp
  • 移码突变
    • protein: p.Arg97fs

Notes

  • 坐标系统为 1-based,
  • 描述核酸和蛋白变异的差别,g.123A>G 和 p.Trp26Ter
  • 可使用在线网站 mutalyzer 检验变异描述是否合规,也可进行c -> g坐标转换等等

Ref:

  • DOI: 10.1002/humu.22981
  • http://varnomen.hgvs.org/recommendations/general

python 表格处理 —— pandas

Posted on 2018-05-18 | Edited on 2018-07-31 | In python

pandas 表格数据处理,唰唰唰…

Data frame

1
2
3
4
5
6
7
8
9
10
11
12
13
14
15
16
17
18
19
20
21
22
23
24
25
26
27
28
29
30
31
32
33
34
35
36
37
import pandas as pd

# 数据框转制
dat = dat.T

# 根据列进行合并
dat = pd.merge(dat1, dat2,
on='col', # col在两个数据框中同时存在时,设置on
left_on='col1', right_on='col2', # 两个列名不同时存在,分贝设置合并列名
left_index=False, right_index=False, # 使用df的index进行合并
how='outdir') # {'left', 'right', 'outer', 'inner'}

# concat 合并列数据
dat = pd.concat(dflst,
axis=1, # 左右合并
join='outer') # {'inner', 'outer'}
# concat 行追加
dat = pd.concat(dflst, axis=0, ignore_index=True)

# 删除数据框行或者列
dat = dat.drop(col_lst, axis=1) # 删除 列
dat = dat.drop(index_lst, axis=0) # 删除 行
dat = dat.drop_duplicates() # 删除 重复行
dat = dat.dropna(axis=0, # 0,1 0表示行,1表示列
how='all') # {'any', 'all'}, all表示删除所有值缺失,any表示删除任意一个值缺失

# 长表格 ==> 宽表格转换
import numpy as np
dat = pd.pivot_table(df, index=["Product"], # 设置保留字段
columns=['Year'], # 扩展列
values=["Price"], # 选定列对应数值
aggfunc=[np.sum], fill_value=0) # 设置数据合并的具体操作

# 宽表格 ==> 长表格转换
df = df.melt(id_vars=["Name","Product"], # 保留的主字段
var_name="Year", # 分类名
value_name="Price") # 变量名

read table

1
2
3
4
5
6
7
8
9
10
11
12
13
14
15
16
17
18
19
20
21
22
23
24
25
26
27
import pandas as pd

dat = pd.read_table('data.csv',
sep='\t', # 设置表格分隔符,read_table默认为‘\t’,read_csv默认为‘,’
index_col=0, # 使用第1列作为数据框index,默认range(0, num_line)作为index
header=None, # 表示文件不存在表头,默认第一行为表头
names=['a', 'b', '']) # 表头不存在时,添加表头为...
# dat = pd.read_csv(...)
dat = pd.read_excel('data.xlsx',
sheet_name='sheet1') # 读取data.xlsx工作簿中sheet1的表格

# 读取文件前特定行数
dat = pd.read_csv('data.csv', nrows=500)

# 读取超大文件
reader = pd.read_csv('data.csv',
iterator=True) # 产生一个迭代器
chunkSize = 100000
chunks = []
while True:
try:
chunk = reader.get_chunk(chunkSize) # 一次读取特定行
# chunk # 进行一些过滤、处理
chunks.append(chunk)
except StopIteration:
break
df = pd.concat(chunks, axis=0, ignore_index=True)

save table

1
2
3
4
5
6
7
8
9
10
11
12
13
14
15
16
17
18
import pandas as pd

# 输出数据到txt文本
dat.to_csv('data.xls',
index=False, # 是否输出df的index
header=False, # 是否输出表头
na_rep='', # 缺省值替换
sep='\t', # 使用tab作为分隔符
encoding='utf-8') # 输出文件使用utf-8编码

# 输出数据框到excel
writer = pd.ExcelWriter('output.xlsx') # 创建输出文件
df1.to_excel(writer,
sheet_name='Sheet1', ) # 输出到工作簿中名为Sheet1的工作表
df2.to_excel(writer,
sheet_name='Sheet2', ) # 输出到工作簿中名为Sheet2的工作表
# ...
writer.save() # 保存工作簿

python 参数解析 —— argsparse

Posted on 2018-05-17 | Edited on 2018-07-31 | In python

argsparse 解析命令行参数,一些常用参数整理。

1
2
3
4
5
6
7
8
9
10
11
12
13
14
15
16
17
18
19
20
21
22
23
24
25
26
27
28
29
30
31
32
33
34
35
36
37
38
39
40
41
42
43
44
45
46
47
48
49
50
51
52
53
54
55
import argparse

parser = argparse.ArgumentParser(# prog=__file__, # 设置项目名称,__file__ 与 sys.argv[0] 一致,默认显示为 basename(__file__)
usage='''
python %(prog)s [option] ''', # 设置脚本输出默认 USAGE 信息
description=''' some script description ''', # 脚本功能描述等等
formatter_class=argparse.RawTextHelpFormatter, # 以脚本内原始文档格式输出描述等信息
epilog='''
Note and input example, and so on. ''') # 脚本描述以外的其他信息

parser.add_argument('-v', '--version', # 添加脚本版本信息参数
action='version',
version='%(prog)s 2.0')

# 添加一个普通的可选参数
parser.add_argument('-e', # 短参数
'--example', # 长参数
dest='example', # 参数对应模块内部,唯一标识符
metavar='', # 设置help信息中参数后字符
action='store', # 参数处理方式
type=str, # 传入参数类型
choices=['a', 'b', 'c'], # 参数选择范围
required=True, # 表示该参数必须被设置
default='a', # 参数缺省时,该参数默认值
nargs='+', # 参数个数,*+?,表示至少一个输入
help='some help infor') # help信息
# action属性为store_true, store_false, store_const时,参数不接任何输入信息
parser.add_argument('--sum',
dest='accumulate',
action='store_const', # 该参数被设置时,参数取值成 const 对应值
const=sum,
default=max,
help='sum the integers (default: find the max)')
# 位置参数
parser.add_argument('pos',
dest='pos_argument',
metavar='',
nargs='+', # 参数输入文件个数
help='some help infor')

# 互斥参数组,组内参数不可同时出现,required=True表示组内必须有参数被设置
exclusive = parser.add_mutually_exclusive_group(required=True)
exclusive.add_argument('-a', )
exclusive.add_argument('-b', )

# 设置多个参数为一组,无实际意义,仅在打印help信息时,分组显示
group = parser.add_argument_group('argument group info')
group.add_argument('-c', )
group.add_argument('-d', )

# parse.print_help()
args = parser.parse_args() # 参数解析,生成可调用对象

example = args.example
# ...

python 执行 linux 命令 —— subprocess

Posted on 2018-05-17 | Edited on 2018-07-31 | In python

python 脚本内执行 linux 命令有多种方式,os.system(), os.popen()也可以,官方最新推荐方式为subprocess

1
2
3
4
5
6
7
8
9
10
11
12
13
14
15
16
17
18
19
20
21
22
23
24
import subprocess

# 执行cmd并等待运行结束,返回执行状态码
subprocess.call('ls', shell=True) # 与 os.system() 功能相似

# 执行cmd并等待运行结束,返回执行状态码
subprocess.check_call('ls', shell=True) # 与subprocess.call()不同,returncode不为0,触发CalledProcessError异常

# 执行cmd并等待运行结束,返回 /dev/stdout 信息
subprocess.check_output('ls', shell=True,
universal_newlines=True) # 以 string 形式返回 stdout 信息,而不是bytes,与 os.popen() 功能相似

# 不等待 cmd 运行结束
job = subprocess.Popen('ls -l', # string of cmd
shell=True, # 传入参数作为 shell 进行执行
stdout=subprocess.PIPE, # 输出标准输出到subprocess流程
stderr=subprocess.PIPE, # 输出标准错误到subprocess流程
universal_newlines=True) # stdout 返回时,使用 string 代替 bytes 类型
pid = job.pid # 获得 cmd 本地执行的 pid
job.wait() # 等待工作结束,默认Popen不等待 cmd 执行完毕即退出
stdout, stderr = job.communicate() # 获得 cmd 执行返回标准输出、标准错误
# 设置 stdin=subprocess.PIPE 时,可以在communicate(input='...')传入参数
job.returncode # 获得 cmd 执行状态码
job.kill() # 杀死 cmd 进程

os 模块实现 linux cmd 执行

1
2
3
4
5
import os

os.system('ls -l') # 直接返回 cmd 执行状态码
# assert not os.system('ls')
os.popen('ls -l') # 以文件句柄的方式返回 cmd 执行的stdout信息

使用 topaht2-fusion 分析 Fusion-Gene

Posted on 2018-05-17 | Edited on 2020-01-07 | In RNAseq

tophat2-fusion 文档搬运工:https://ccb.jhu.edu/software/tophat/fusion_tutorial.shtml

###step1.tophat

1
tophat2 -p 8 -o $OUTPUT --fusion-search --keep-fasta-order --bowtie1 --no-coverage-search --fusion-anchor-length 10 --fusion-min-dist 100000 --mate-inner-dist 40 --mate-std-dev 100 $hg_bowtie1_index $read1.fastq.gz $read2.fastq.gz

Note:

–fusion-search,融合 reads 搜索

–keep-fasta-order,

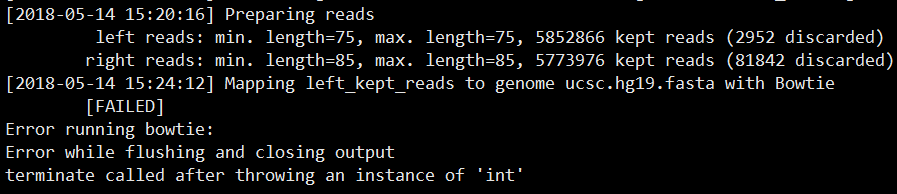
–bowtie1,使用 bowtie1 代替 bowtie2 进行 reads 比对。需要使用 bowtie-1.1.2,最新版本 1.2.2 会报错

–no-coverage-search,

–fusion-anchor-length 10 ,

–fusion-min-dist 100000 ,

–mate-inner-dist 40 ,

–mate-std-dev 100 ,

###step2.tophat-fusion-post

1
tophat-fusion-post -p 8 --num-fusion-reads 1 --num-fusion-pairs 2 --num-fusion-both 5 $hg_bowtie1_index

Note:

–num-fusion-reads* , 支持融合的最少 reads 数目

–num-fusion-pairs, 支持融合事件的最少配对 reads 数,表示为跨越融合点的测序片段

–num-fusion-both, 支持融合的最少 reads,包括跨越的 reads 对和 split reads

–fusion-read-mismatches, Reads support fusions if they map across fusion with at most this many mismatches. The default is 2.

–fusion-multireads, Reads that map to more than this many places will be ignored. The default is 2.

–non-human, If your annotation is different from that of human, use the option.

–fusion-pair-dist, Pairs with this specified distance are counted as supporting evidence for the fusion. The default threshold for the inner distance is 250.

results

测试了多个样品,多个参数,也根据官网数据、命令运行项目,都没有发现任何融合结果,bug还是打开方式不对

使用 STAR-fusion 分析 Fusion-Gene

Posted on 2018-05-15 | Edited on 2020-01-07 | In RNAseq

软件文档:https://github.com/STAR-Fusion/STAR-Fusion/wiki

##软件安装

  1. STAR,https://github.com/alexdobin/STAR
  2. 运行依赖 perl 模块
    1. DB_File
    2. URI::Escape
    3. Set::IntervalTree
    4. Carp::Assert
    5. JSON::XS
    6. PerlIO::gzip
    7. common::sense
    8. Types::Serialiser
    9. Canary::Stability

##数据库准备

下载一个较小的未处理的参考文件,自己运行 index 命令。要是网速够快也可以直接在 index 好的数据库文件,~27G

1
2
3
4
5
6
7
wget -c https://data.broadinstitute.org/Trinity/CTAT_RESOURCE_LIB/GRCh37_v19_CTAT_lib_Feb092018.source_data.tar.gz
$STAR_FUSION_HOME/FusionFilter/prep_genome_lib.pl \
--genome_fa ref_genome.fa \
--gtf ref_annot.gtf \
--fusion_annot_lib CTAT_HumanFusionLib.v0.1.0.dat.gz \
--annot_filter_rule AnnotFilterRule.pm \
--pfam_db PFAM.domtblout.dat.gz

##运行STAR-Fusion

STAR-Fusion 对 STAR 输出的嵌合比对分析发现可能存在的基因融合事件

从 fastq 文件开始

1
2
3
4
5
6
$STAR_FUSION_HOME/STAR-Fusion \
--genome_lib_dir /path/to/your/CTAT_resource_lib \
--left_fq reads_1.fq \
--right_fq reads_2.fq \
--output_dir star_fusion_outdir \
--no_remove_dups

从 STAR 产生 Bam 文件开始

1
2
3
4
5
6
7
8
9
10
11
12
13
14
15
16
17
STAR --genomeDir ${star_index_dir} \
--readFilesIn ${left_fq_filename} ${right_fq_filename} \
--twopassMode Basic \
--outReadsUnmapped None \
--chimSegmentMin 12 \
--chimJunctionOverhangMin 12 \
--alignSJDBoverhangMin 10 \
--alignMatesGapMax 100000 \
--alignIntronMax 100000 \
--chimSegmentReadGapMax 3 \
--alignSJstitchMismatchNmax 5 -1 5 5 \
--runThreadN ${THREAD_COUNT} \
--outSAMstrandField intronMotif

STAR-Fusion --genome_lib_dir /path/to/your/CTAT_resource_lib \
-J Chimeric.out.junction \
--output_dir star_fusion_outdir

输出文件

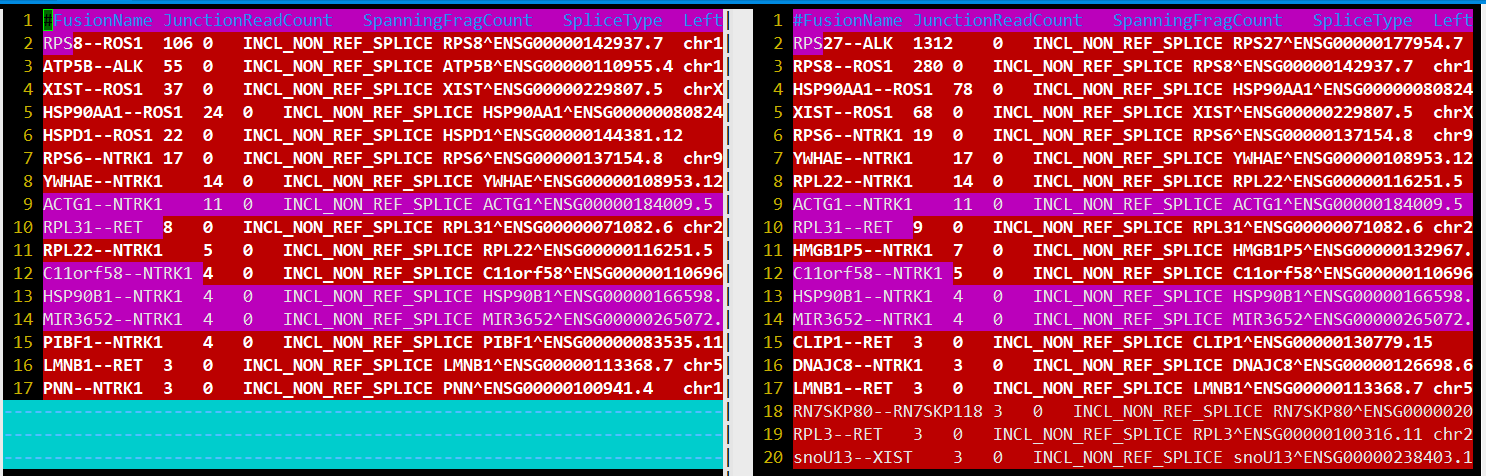
STAR 速度还是那么让人惊喜,6m reads不到半小时。 融合结果star-fusion.fusion_predictions.abridged.tsv

FusionName,
JunctionReadCount, split align到融合点的序列片段数
SpanningFragCount, 双端reads跨越融合点的序列片段数
SpliceType, 断点是否在注释文件存在
LeftGene,
LeftBreakpoint,
RightGene,
RightBreakpoint,
LargeAnchorSupport,
FFPM, fusion fragments per million total reads
LeftBreakDinuc,
LeftBreakEntropy,
RightBreakDinuc,
RightBreakEntropy,
annots,

结果比较

真是一个悲伤的故事,根据官网给的两种运行方式,结果差别这么大。查看 STAR-Fusion 脚本,使用的 mapping 参数差异有点大啊,哪一个比较合理呢(一个新坑)???

使用 trimmomatic 进行数据质控

Posted on 2018-05-13 | Edited on 2018-07-31 | In bioinfor

trimmomatic 使用 java 编写,免安装多平台运行,同时运行速度非常快。

1
2
3
4
5
6
7
8
9
10
11
# paired end 
java -jar trimmomatic-0.32.jar PE -threads 8 -phred33 \
sample_R1.fastq.gz sample_R2.fastq.gz \
sample_R1_paired.fastq.gz sample_R1_unpaired.fastq.gz \
sample_R2_paired.fastq.gz sample_R2_unpaired.fastq.gz \
ILLUMINACLIP:TruSeq3-PE.fa:2:30:10 SLIDINGWINDOW:4:15 MINLEN:36

# single end
java -jar trimmomatic-0.32.jar PE -threads 8 -phred33 \
sample.fastq.gz sample_clean.fastq.gz \
ILLUMINACLIP:TruSeq3-PE.fa:2:30:10 SLIDINGWINDOW:4:15 MINLEN:36

参数选择
PE/SE

设定对 Paired-End 或 Single-End 的 reads 进行处理,其输入和输出参数稍有不一样

threads

设置多线程运行数

phred33/phred64

设置碱基的质量格式,可选 phred64

ILLUMINACLIP::::::

切除 adapter 序列。参数后分别接 adapter 序列的 fasta 文件,允许的最大 mismatch 数, palindrome 模式下匹配碱基数阈值: simple 模式下的匹配碱基数阈值

minAdapterLength:只对 PE 测序的 palindrome clip 模式有效,指定 palindrome 模式下可以切除的接头序列最短长度,由于历史的原因,默认值是 8,但实际上 palindrome 模式可以切除短至 1bp 的接头污染,所以可以设置为 1 。
keepBothReads:只对 PE 测序的 palindrome clip 模式有效,这个参数很重要,在上图中 D 模式下, R1 和 R2 在去除了接头序列之后剩余的部分是完全反向互补的,默认参数 false,意味着整条去除与 R1 完全反向互补的 R2,当做重复去除掉,但在有些情况下,例如需要用到 paired reads 的 bowtie2 流程,就要将这个参数改为 true,否则会损失一部分 paired reads。

SLIDINGWINDOW

从 reads 首端( 5’端)开始进行滑动,当滑动位点周围一段序列(window)的平均碱基低于阈值,则从该处进行切除。 Windows 的 size 是 4 bp, 若其平均碱基质量小于15,则切除

MAXINFO:
LEADING/TRAILING>

切除 reads 首端( 5’端) / reads 末端( 3’端)碱基质量小于指定值的碱基

CROP/HEADCROP

从 reads 末端( 3’端)/reads 首端( 5’端)切除碱基到指定长度

MINLEN

抛弃低于指定长度的 reads

TOPHRED33/TOPHRED64

转换碱基质量格式,Illumina HiSeq 2000质量系统为phred-64,可用该参数转换到phred-33

VCF 注释 —— SnpEff

Posted on 2018-05-09 | Edited on 2019-04-21 | In bioinfor

日常工作之读文档,了解参数改变、新方法功能,对已有流程进行修改。

各种文档看一边遍一遍,使用需要又一次看 SnpEff (http://snpeff.sourceforge.net/index.html ),进行一些整理如下,不过还是建议原文,鬼知道我会在哪里写错理解错。

运行

  1. annotation

    1
    2
    3
    4
    5
    6
    7
    8
    java -jar snpEff.jar eff genome input.vcf >output.vcf

    # -hgvs, 默认开启,使用 HGVS 变异描述语法对蛋白替换进行描述
    # -fi, 提供bed文件,只对bed区域内位点进行注释
    # -no-downstream, -no-intergenic, -no-intron, -no-upstream, -no-utr, -no [effectType], 参数还可对根据注释类型对注释进行初过滤
    # -canon, 只使用基因对应最长转录本(作为权威转录本)进行注释;参数-canonList可以自行提供基因权威转录本,格式为“GeneID transcript_ID”
    # -noStats, 不输出注释统计信息
    # -v, 话痨模式,输出各种运行信息

    ​

  2. database

    人、小鼠等物种都有已经 build 的数据库,可以直接下载,链接:https://sourceforge.net/projects/snpeff/files/databases/v4_3/,注释选择基因组版本。

    1
    2
    3
    4
    java -jar snpEff.jar databases    # 查看可用数据库
    java -jar snpEff.jar download -v GRCh37.75 # 下载数据库 GRCh37.75

    # Q, 使用执行程序下载数据库时容易断,一般建议手动下载,或者wget等其他方式

    软件还提供了自行构建数据库,详细用法如下:

    1
    2
    3
    4
    5
    6
    7
    8
    9
    10
    11
    12
    13
    14
    15
    16
    17
    18
    19
    # 添加配置信息
    echo 'GRCh37.70.genome : Human ' >>~/snpEff/snpEff.config

    # Create directoy for this new genome
    mkdir -p ~/snpEff/data/GRCh37.70 && cd ~/snpEff/data/GRCh37.70
    # Get annotation files
    wget -c -O genes.gtf.gz ftp://ftp.ensembl.org/pub/release-70/gtf/homo_sapiens/Homo_sapiens.GRCh37.70.gtf.gz
    # Get the genome
    wget -c -O sequences.fa.gz ftp://ftp.ensembl.org/pub/release-70/fasta/homo_sapiens/dna/Homo_sapiens.GRCh37.70.dna.toplevel.fa.gz
    # Optional, Download CDSs
    wget -c -O cds.fa.gz ftp://ftp.ensembl.org/pub/release-70/fasta/homo_sapiens/cdna/Homo_sapiens.GRCh37.70.cdna.all.fa.gz
    # Optional, Download proteins
    wget -c -O protein.fa.gz ftp://ftp.ensembl.org/pub/release-70/fasta/homo_sapiens/pep/Homo_sapiens.GRCh37.70.pep.all.fa.gz
    # Optional, Download regulatory annotations
    wget -c -O regulation.gff.gz ftp://ftp.ensembl.org/pub/release-70/regulation/homo_sapiens/AnnotatedFeatures.gff.gz

    # Building a database from GFF files
    cd ~/snpEff && java -jar snpEff.jar build -gff3 -v GRCh37.70
    # rm -r ~/snpEff/data/GRCh37.70

    此外,snpEff 构建数据库还支持 RefSeq, GenBank 等多种数据输入格式,具体用法查看原文档。

    注意物种 codon 选择,codon 可以在 https://www.ncbi.nlm.nih.gov/Taxonomy/Utils/wprintgc.cgi 中查看,codon可以在~/snpEff/snpEff.config文件中设置:

    1
    2
    3
    4
    # 设置特异 codon
    codon.Invertebrate_Mitochondrial: TTT/F, TTC/F, TAC/Y, TAA/*, ATG/M+, ATG/M+, ACT/T, ...
    # 物种选择恰当的 codontable
    dm3.M.codonTable : Invertebrate_Mitochondrial # the chromosome 'M' from fly genome (dm3) uses Invertebrate_Mitochondrial codon table

    ​

  3. dump

    从数据库中提取出注释信息

    1
    2
    3
    java -jar snpEff.jar dump -v -bed GRCh37.70 > GRCh37.70.bed
    # [-bed |-txt ] 设置数据格式
    # [-0 |-1 ] 设置坐标系统,0-based 或者 1-based

注释结果

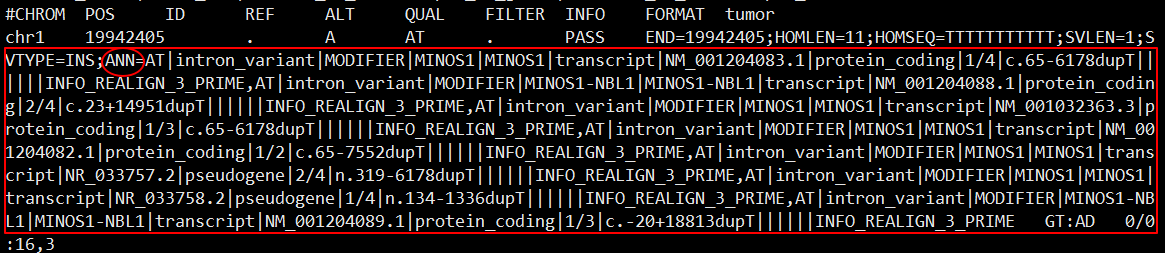
可以看到注释信息被添加到了 VCF 中每个变异 INFO 信息中,以 ANN= 特征开始,详细的注释说明可查看官方文档: http://snpeff.sourceforge.net/VCFannotationformat_v1.0.pdf。因为基因多个转录本、相互重叠基因等原因,可以看到变异位点被多次注释,需根据实际需求进行筛选。

12345
© 2020 ChengCZ